Camtasia Studio is the go-to tool for creating professional video tutorials, presentations, and lectures. Although there are many good video editing tools such as ShotCut and PowerDirector. Camtasia is still the most popular tool, especially because of its ability to add catchy music to the background of your video and the friendly UI. In terms of music, Spotify is a platform the gives you access to millions of songs to choose from for your video presentations. However, if you are trying to add Spotify music to Camtasia, you may have some difficulties.
Spotify music is encoded, preventing uses from using the songs outside Spotify’s application. But there’s a way around this. Read on, as, in this guide, we will introduce you to an excellent Spotify music converter that will enable you to add music to Camtasia with ease.
- Part 1. Can You Add Music to Camtasia?
- Part 2. Best Tool to Convert Spotify Music for Camtasia
- Part 3. How to Import Spotify Music to Camtasia
Part 1. Can You Add Music to Camtasia?
Camtasia allows its users to import local audio files to their videos. So, to add background music to a video in Camtasia studio, it has to be in a format compatible with Camtasia. Spotify, however, has a Digital Right Management Technology (DRM) that prevents users from downloading and using music outside Spotify’s platform. Therefore, you can’t add Spotify music to video in Camtasia directly unless you use a music converter.
Part 2. Best Tool to Convert Spotify Music for Camtasia
A music converter helps you to convert Spotify music to audio formats that are compatible with Camtasia. AudBite Spotify Music Converter is a tool that allows you to save Spotify tracks and playlists to popular formats like MP3, AAC, FLAC, WAV, M4A, and M4B. It removes DRM protection and retains the quality of the music.
AudBite is available for both Windows and Mac users; it is safe to use and works well for premium and free Spotify users. Its excellent features like fast download and conversion speed, batch download and easy-to-use interface make it a top choice among users.
Main Features of AudBite Spotify Music Converter
- Download ad-free songs from Spotify without premium easily
- Convert Spotify music to MP3, AAC, WAV, FLAC, M4A, M4B
- Save Spotify music up to 320kpbs and with ID3 tags retained
- Support downloading Spotify music in batch at 5× faster speed
Tutorial: How to Convert Spotify Music to Camtasia Compatible Format
Using AudBite Spotify Music Converter makes it easy to import Spotify music to Camtasia. Follow the steps below to convert Spotify Music to an MP3 format that is compatible with Camtasia.
Step 1: Download and Install AudBite Spotify Music Converter
First, download and install AudBite Spotify Music Converter, then launch the application when installation is complete. Spotify will automatically open once you launch the AudBite application. Log in to Spotify and browse through the Spotify library and select your desired songs.
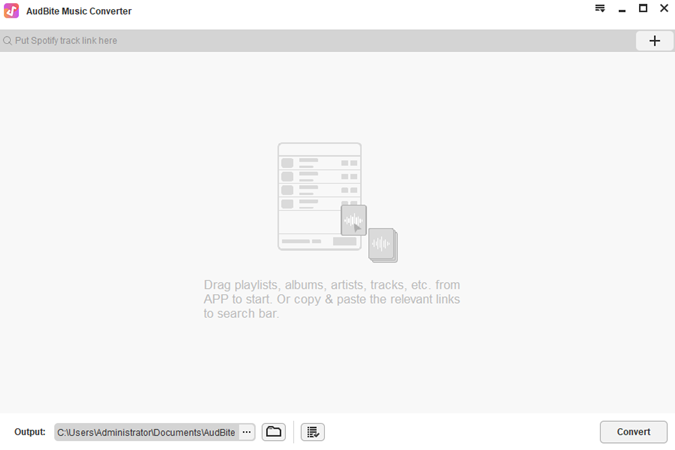
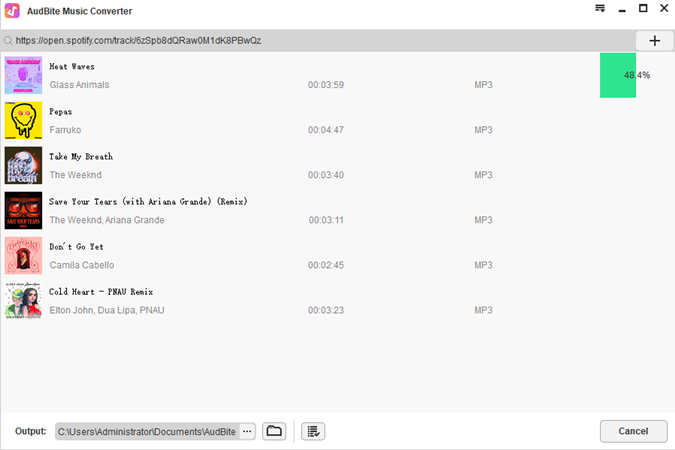
Step 2: Select Spotify Music or Playlists to Download
Drag the selected songs from Spotify to the AudBite interface. You can also copy the URL of the music, paste it in the search box of the interface, and click + to add the song.
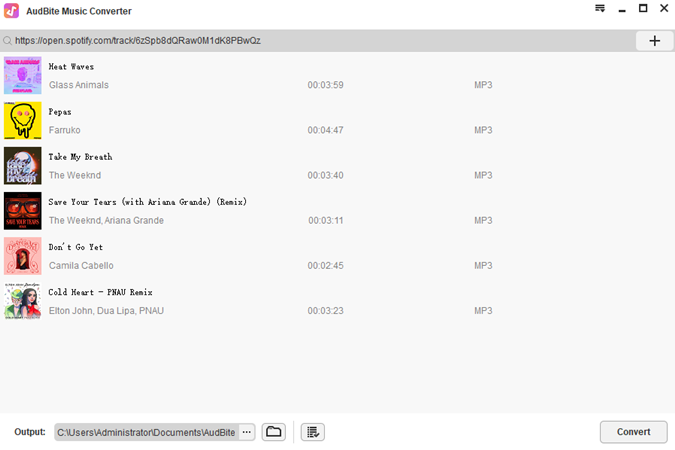
Step 3: Choose Your Output Preferences
In this step, you will have to choose your desired output format. Click the Menu bar, and select the Preferences option from the menu. Click the Convert tab then you can see there are many options to personalize the properties of the output. You can choose the output folder, format, channel, bit rate, and sample rate you want for your output. Save the changes by clicking the OK button once you are done with the customization.

Step 4: Download and Convert Spotify Tracks
To begin the conversion of the Spotify songs to your chosen format, click the Conversion button. The process will start instantly. Once it is complete, you will see all downloaded songs in the Converted list. Click on the Converted icon to view and access all songs. You can now add music from Spotify to Camtasia and use these songs on any device and platform without limits.
Part 3. How to Import Spotify Music to Camtasia
After downloading and converting the Spotify music to your computer, you can follow the steps below to import Spotify music to Camtasia videos.
Step 1: Open Your Video
Launch Camtasia Studio on your computer. Open the video you want to add Spotify music or create a new project.
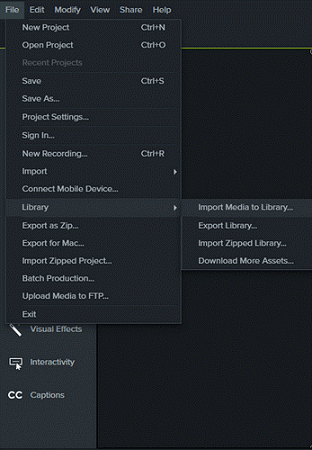
Step 2: Import the Media
There are various ways to import media to your media bin in Camtasia. Click on Media on the menu, right-click in the bin, and choose Import Media from the displayed menu.
Alternatively, you can navigate via File > Library > Import Media to Library to import the converted Spotify music on your computer.
Step 3: Add the Music to Your Timeline
After importing the Spotify music, find it in the media bin. Click on it, then drag and drop it on the timeline.
Step 4: Adjust the Audio
This is where you make some adjustments to the music according to your needs. Do you want it to run through the entire video? Or do you just want the music in specific parts? You can also adjust the volume of the video. When you click on the audio track in the timeline, a shading line appears. Drag this line up or down to adjust the volume to your desired level.
Conclusion
AudBite Spotify Music Converter has made it relatively easy to add Spotify music to Camtasia. This article has shown you how to use this smart tool to download Spotify tracks in audio formats that can be used for Camtasia background music and other purposes. If you are interested in AudBite, go to the official website and give it a shot!