Spotify is one of the most popular music streaming platforms, and parts of its popularity come from its free streaming services. However, given that Spotify users with free accounts are constantly interrupted by ads interspersed with songs and unable to download them for offline listening, the demand for recording music from Spotify was born. Of all the options, Audacity, a free and classic audio recording software and editor, stands out. If you are also wondering how to record Spotify music with Audacity, then stay here to learn complete instructions. As an alternative, we will show a dedicated Spotify recorder and downloader for you.
- Part 1. How to Record Spotify with Audacity [with Ads]
- Part 2. Alternative to Audacity for Recording Spotify [No Ads]
- Part 3. Differences between Audacity and AudBite
Part 1. How to Record Spotify with Audacity
Audacity is one of the most renowned free audio editors. It’s completely free with all-around functions, including recording voices and editing audio. Although it might have a bit steep learning curve, it is worth your time and effort. That’s why it’s loved by plenty of users.
If you have trouble downloading music from Spotify, you might as well record Spotify with Audacity, which can record the system sound of your computer. However, it’s worth noting that Spotify music recorded by Audacity will contain ads. There are several steps to use audacity to record Spotify music, and we will explain how in detail.
Step 1: Configure Settings to Record Spotify
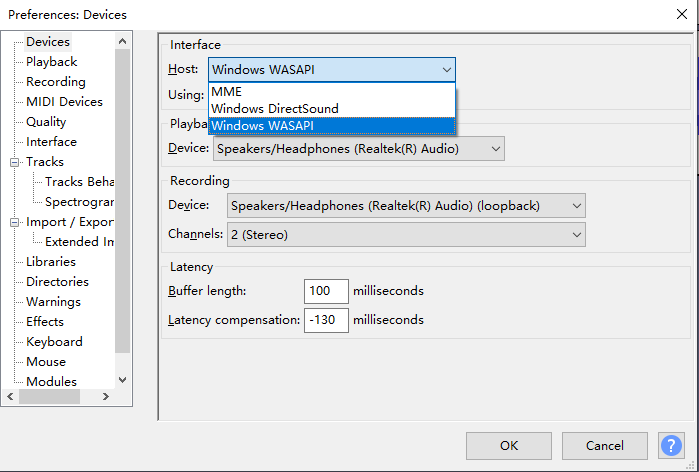
Download and install Audacity on your PC, and launch it from the desktop. And then hit on the Edit button from the top-left toolbar. Then, go to the Preferences > Audio Host Box > Windows WASAPI button.
Step 2: Turn Software Playthrough Off for Recording
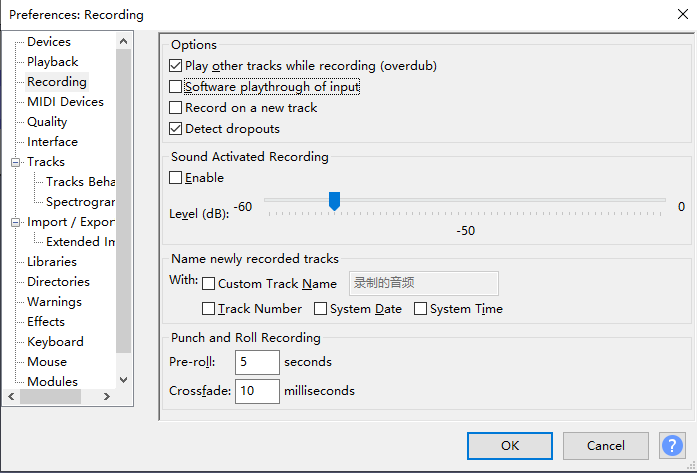
Next, you should turn the Software playthrough off when recording system sound in Audacity. To do this, please go to Transport > Transport Options > Software playthrough of input to uncheck it. Or you can do it by tabbing the ‘Recording‘ under the ‘Audacity Preferences‘.
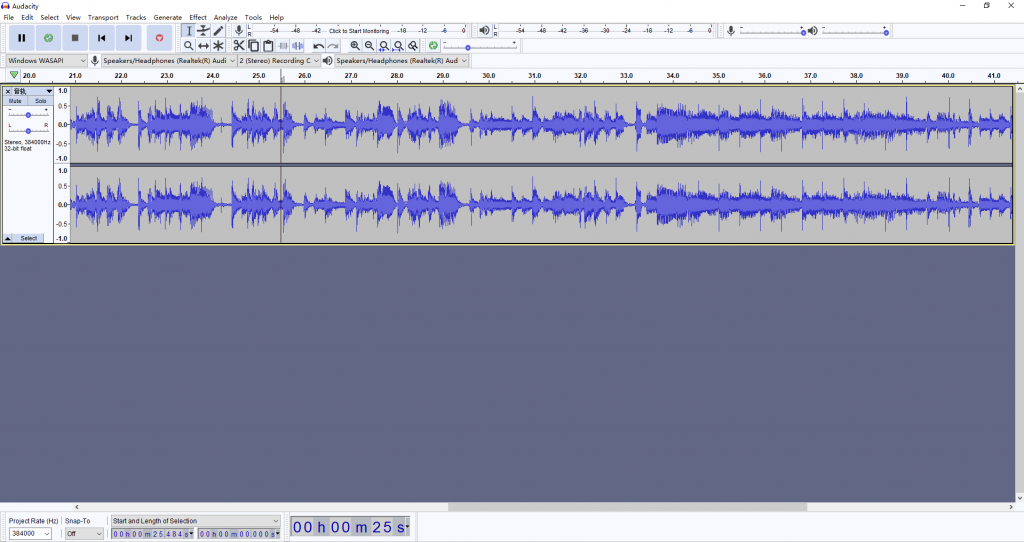
Step 3: Record Spotify with Audacity
Click on the red recording button in Audacity, then simply play Spotify music that you’d like to download. Audacity will automatically record whatever Spotify plays in real time, including both music and ads. When all audios are recorded well, simply click the ‘Stop‘ icon to save Spotify recordings to your computer.
Note: Remember not to play other audio files on your computer, otherwise, they will be recorded as well. Also, you can “Stop” to skip unwanted ads and only record your favorite segments.
Step 4: Save Recorded Spotify Music
Here you should click on “File” at the top left corner and choose “Export Audio…” from the drop-down menu to save your recorded Spotify music in the desired location on your computer.
- Powerful editing features, including trim, cut, draw, copy, and more
- Support recording music from Spotify, Tidal, Deezer, and more
- Support many formats like MP3, FLAC, OGG, AIFF, and WAV
- Totally free
Pros:
- Difficult to use
- Record ads as well
- Record songs one by one
- Take a lot of time to record
Cons:
Part 2. Best Way to Record Spotify with Audacity Alternative
With the way we mentioned above, you can record songs from Spotify. But we all know is not real downloading. By the end of the day, Audacity is only a Spotify recorder, not to mention there will be ads in the recorded tracks.
Don’t want those annoying ads? Then we recommend you AudBite Spotify Music Converter, a real downloader. To download Spotify on your PC or Mac, AudBite is the perfect tool you are looking for. It will easily download songs to MP3, AAC, FLAC, and many other formats. In addition, batch downloading and converting are available, as this tool can download and convert an entire playlist without damaging the original quality.
ID3 tags and metadata information will be retained and the Spotify protection will be removed, which allows you to play the downloaded music on any device you want. In terms of speed, the software can download and convert at 5× speed. Besides, it’s highly user-friendly – even beginners can get familiar with it in a few minutes.
Main Features of AudBite Spotify Music Converter
- Download ad-free songs from Spotify without premium easily
- Convert Spotify music to MP3, AAC, WAV, FLAC, M4A, M4B
- Save Spotify music up to 320kpbs and with ID3 tags retained
- Support downloading Spotify music in batch at 5× faster speed
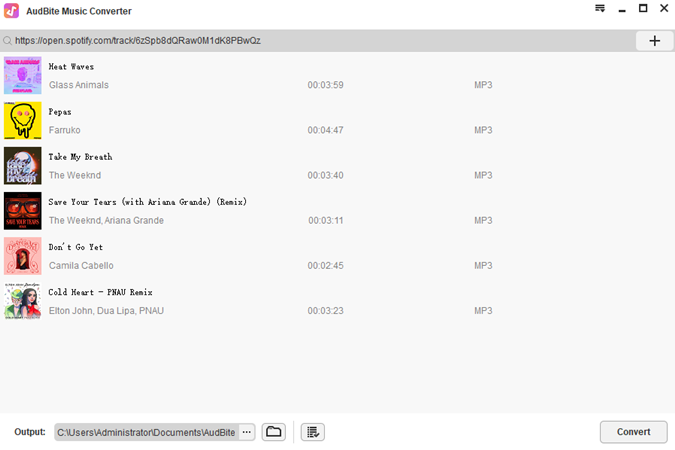
Step 1 Add Spotify track or playlist to AudBite
Launch AudBite Music Converter, and Spotify will also be opened automatically. Find the Spotify song or playlists you want, right-click on them, then click on the Share button, copy the link then paste it to our downloader’s search bar. Next, hit the + button to confirm adding the song and playlist. Alternatively, you can just drag and drop them to the downloader’s interface.
Step 2 Configure the output preferences
Before downloading and converting, it’s advisable to customize the output format and parameters according to your needs. In the AudBite program, click the menu bar on the top right and then the Preferences option. In the pop-up window, select the Convert tab, where you can choose your preferred output format. You can also adjust other parameters like bit rate, channel, conversion speed, and sample rate to get the best listening experience. Once completing the settings, remember to press the OK button to save the changes.

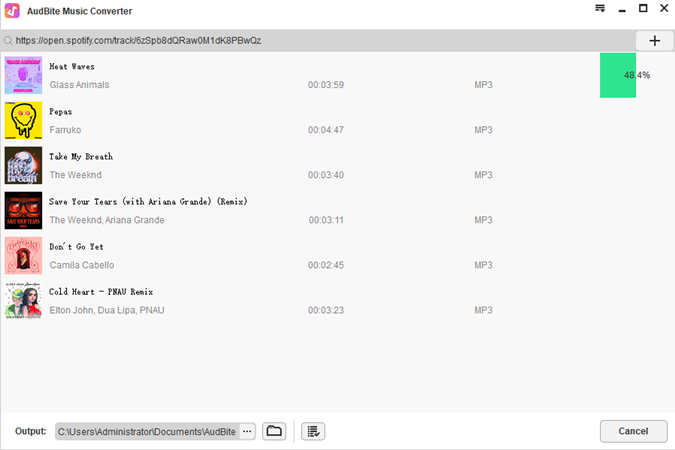
Step 3 Download Spotify music to computer
Click the Convert button to initiate the downloading and conversion process. Then all you have to do is to wait for a few minutes, and the AudBite program will complete the download and conversion in no time at all. To find the converted music, click the Converted button in the bottom toolbar (there should be a notification bubble on it), and click on the magnifier-shaped icon to head to the converted music folder.
- Easy to use and easy interface
- Support converting songs in batch at a time
- Support customizing parameters, including bit rate, sample rate, and channel
- Lossless output audio quality
- 5X converting speed
- Classify recorded Spotify songs by artists or albums
- No ads from Spotify music
Pros:
- Only download songs from Spotify
Cons:
Part 3. Differences between Audacity and AudBite
In this part, we have made a comparison table for you. Therefore, you can understand the advantages and disadvantages of both Audacity and its alternative – AudBite Music Converter, more clearly. Then just choose which one to use according to your personal needs.
| Audacity | AudBite Music Converter | |
| Supported OS | Windows, Mac, Linux | Windows, Mac |
| Output Quality | Lossy quality | 100% Lossless Quality |
| Sample Rate | X | From 8000 Hz to 48000 Hz |
| Bit Rate | X | From 8kbps to 320kbps |
| Channel | X | 1, 2 |
| Conversion Speed | 1x | 5x, 1x |
| Output Format | MP3, WAV, FLAC, AIFF, AU, Ogg Vorbis | MP3, M4A, M4B, AAC, WAV, FLAC |
| Auto-filter Spotify Ads | No | Yes |
| Batch Recording and Downloading | No | Yes |
| Archive Output Tracks | No | Yes, by artist, album, artist/album, none |
Summary
Here you have knew how to record Spotify music with Audacity and its alternative. If you only need to record several songs and don’t mind ads, Audacity can be a good option to use for free. However, if you’d like to capture music from Spotify in batch mode with 100% original quality and no ads, AudBite Music Converter can be your choice. Now you can get a solution based on your own situation to enjoy your music journey.